NetStores E-Commerce Extensions
Configuring your store
Overview
You will need to configure your store at NetStores so that your company logo and product images and pages are available to NetStores.
Step 6: Login (top)
In Adobe GoLive, in the NetStores Configuration dialog box (image), enter your correct Merchant Id and Password and click Login.
(If your NetStores Configuration dialog box is not open, you can open it by choosing NetStores > Configure your store from the Adobe GoLive menu bar.)
Configuration at NetStores (top)
In the NetStores Merchant Administration Area, under Configuration click Configure Your Store (see figure below). Access to the Merchant Administration Area requires a Merchant ID. If you do not yet have a Merchant ID, go back to Setup.
Logo (top)
To unify the appearance of your pages and the shopping cart, search and quick form pages, NetStores displays your company logo at the top of the pages it generates. You need to upload your logo to the NetStores server for this purpose.
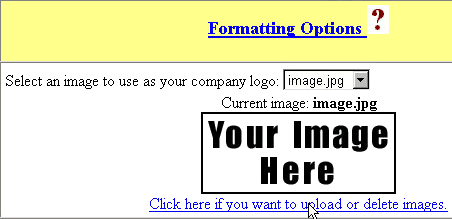
- Click Formatting Options.
- Then choose Click here if you want to upload or delete images.

- Browse for your company logo on your local computer, and upload it.
- Then select the logo's file name from the drop-down list next to Select an image to use as your company logo (see picture above).
- Scroll down to the bottom of the page and click Save Changes.
- Click Continue Store Configuration.
Setup to use product images and pages (top)
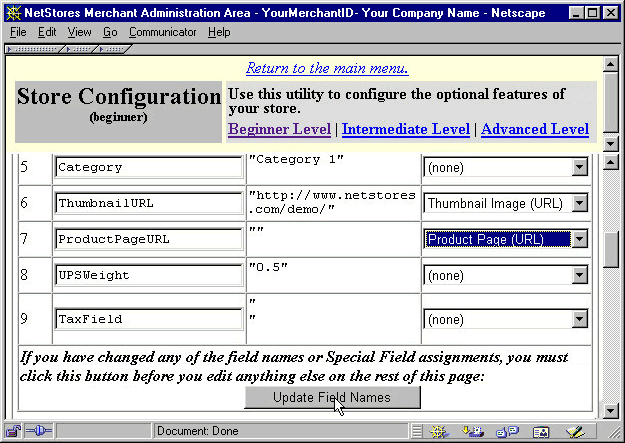
NetStores needs product image and page URLs so it can make appropriate links on your shopping cart and search pages. You will provide the URLs in the item file you will make in a later step. To set up NetStores to use them properly, perform the following steps:

- In the Field Name form, scroll down and select Thumbnail Image (URL) from the drop-down menu in line 6, column three (see figure below).
- Next select Product Page (URL) from the drop-down menu in line 7, column three (see figure below).

- Then click Update Field Names (see picture above).
Continue to Step 7 - connect the item file (top)
When you connect the item file in Adobe GoLive, you give the NetStores objects, such as Add to Cart, the information they need about your products.
For additional information, go to the online Adobe GoLive extensions page at http://GoLive.netstores.com/.
Getting Started / Installing / Setup / Item File / Configure Store / Connect Item File /
Objects: / Add to Cart / View Cart / Search / Quick Search / Driven Search / Quick Form
Copyright © 2001, Fishbone Communications, Inc. - NetStores ®
Last Modified 11-19-2001
|


